Sourdough
January is a great time to get stuck into a new hobby, which is why I've included my sourdough recipe here. To begin, you need a starter (see below). Once it's bubbling, you are ready to bake. I 'feed' my starter every other day or so (meaning I remove about half the starter and replace it with fresh water and flour). I find this freshness gives the best results; try not to leave it longer than three days between feeds. It sounds onerous but, once you fit it into your daily routine, it becomes second nature and, even, rather cathartic.
My sourdough routine: I feed my starter once every two to three days after breakfast. The day before I want bread, I make the levain just after breakfast. I leave it to bubble until around 5pm, when I mix it with 300ml water and 500g flour. I leave it for at least 3 hours (up to a maximum of 4 hours) before adding 10g salt and 25ml water, which I fold in carefully by hand. I leave it another 15 minutes, then begin the stretch and folds at half hourly intervals (more details below). These timings mean that, just before I go to bed, I can put the dough in its banneton (proving basket) and leave it in a cool place for its overnight prove. To avoid overproving, I rise fairly early the next day (around 7am) to pre-heat the oven. When it's up to temperature, I am ready to bake. An hour later, I have fresh bread for breakfast.
A note on starters: I recommend making a white starter to begin with. In my experience, it's much more predictable and ensures a good rise each time. I use Shipton Mill's Canadian Strong White Flour, good for breads which have a long fermentation process. I also keep another starter, made using wholemeal flour, so that I can also make wholemeal loaves. I use Shipton Mill's Heritage Blend Stoneground Wholemeal Organic Flour. I feed them both at the same time, so I don't find it too difficult to keep them both going.
A note on equipment: start modestly: instead of a banneton proving basket, just line a standard-size basket with a clean tea towel. Instead of a lame (a sharp blade for scoring the bread), just use a sharp knife. However, the best results in the oven come from locking in the steam during the first 30 minutes, for which you really need a heavy-duty cast iron casserole dish with a lid (both oven-proof). Samuel Groves make reasonably priced ones. When you've decided whether or not sourdough making is for you, you can invest in bannetons and a lame if you want to. For the starter, use a medium-sized jam jar or Kilner-style jar.
To make the starter for the first time
Combine 50g strong white flour with 50ml lukewarm water in a jar. Leave it in a warm place (not hot). Each day, remove half of the starter (the 'discard' - see below for tips to avoid wastage) and replace it with 50g flour and 50ml lukewarm water. By the third day or so, you should begin to see bubbles. It's important to keep the starter small, so do remember to discard half each time. Once it's bubbling, you can begin the bread-making process (below).
To maintain your starter
Leave it out at room temperature and aim to feed it once every two to three days. If in a warm place, such as next to an Aga or in the airing cupboard, you'll find that it stays active for longer, so you might get away with feeding it less frequently; judge the required frequency based on how bubbly it is. To reduce the quantity of discard waste, you can now afford to remove less and add less: remove a few spoonfuls, then add 30g bread flour and 30ml water, and mix together. If you're not baking bread regularly, you can remove and add even smaller amounts. Just remember always to add equal quantities of each, and always to keep your starter fairly small and fresh by removing some discard each time. Personally, I don't keep my starter in the fridge: I prefer to bake spontaneously, which means having ready access to a bubbling starter at all times (keeping it in the fridge requires more advance planning, bringing it up to temperature and getting it bubbling again. In my experience, it takes more than a few feeds to remove it from its dormant state, by which time the moment has passed!).
A note on sourdough discard
As you'll see, this process produces a fair amount of 'discard'. Rather than throwing it away, freeze it until you've amassed enough to bake with it. See my sourdough discard recipes for some ideas of what to make. For example, my banana loaf here and my Cornish saffron buns here.
Once you're feeling proficient
Once you've mastered the standard sourdough loaf, why not try my cheese and marmite version or, for Christmas, my sourdough stollen.
To make a sourdough loaf
1. When you want to bake, make sure your starter is ready. The day before, feed the starter with 50g bread flour and 50ml water.
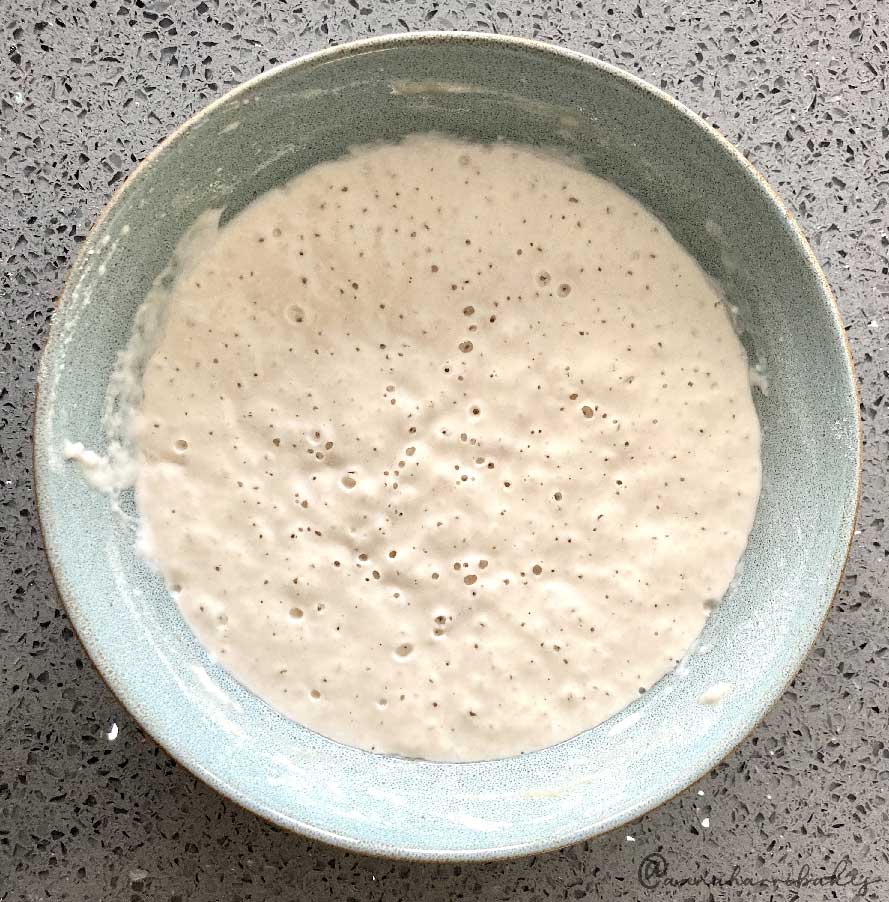
2. When it’s looking bubbly (probably around 8 hours later), you can make a levain. Take two generous tablespoonfuls of starter and mix them with 50g bread flour and 50ml water. Leave this levain, covered, for around 8 hours or overnight. (Tip: to kick-start your starter or levain, put them in the oven - covered - on a very low temperature - the lowest your oven can be set at. No higher than 25°C). You can test if your starter or levain are ready by seeing if a spoonful floats in slightly warm water. The success of the loaf is all in the starter and levain - they've got to be bubbly before you start. The oven trick is particularly useful if your house is cold.
January is a great time to get stuck into a new hobby, which is why I've included my sourdough recipe here. To begin, you need a starter (see below). Once it's bubbling, you are ready to bake. I 'feed' my starter every other day or so (meaning I remove about half the starter and replace it with fresh water and flour). I find this freshness gives the best results; try not to leave it longer than three days between feeds. It sounds onerous but, once you fit it into your daily routine, it becomes second nature and, even, rather cathartic.
My sourdough routine: I feed my starter once every two to three days after breakfast. The day before I want bread, I make the levain just after breakfast. I leave it to bubble until around 5pm, when I mix it with 300ml water and 500g flour. I leave it for at least 3 hours (up to a maximum of 4 hours) before adding 10g salt and 25ml water, which I fold in carefully by hand. I leave it another 15 minutes, then begin the stretch and folds at half hourly intervals (more details below). These timings mean that, just before I go to bed, I can put the dough in its banneton (proving basket) and leave it in a cool place for its overnight prove. To avoid overproving, I rise fairly early the next day (around 7am) to pre-heat the oven. When it's up to temperature, I am ready to bake. An hour later, I have fresh bread for breakfast.
A note on starters: I recommend making a white starter to begin with. In my experience, it's much more predictable and ensures a good rise each time. I use Shipton Mill's Canadian Strong White Flour, good for breads which have a long fermentation process. I also keep another starter, made using wholemeal flour, so that I can also make wholemeal loaves. I use Shipton Mill's Heritage Blend Stoneground Wholemeal Organic Flour. I feed them both at the same time, so I don't find it too difficult to keep them both going.
A note on equipment: start modestly: instead of a banneton proving basket, just line a standard-size basket with a clean tea towel. Instead of a lame (a sharp blade for scoring the bread), just use a sharp knife. However, the best results in the oven come from locking in the steam during the first 30 minutes, for which you really need a heavy-duty cast iron casserole dish with a lid (both oven-proof). Samuel Groves make reasonably priced ones. When you've decided whether or not sourdough making is for you, you can invest in bannetons and a lame if you want to. For the starter, use a medium-sized jam jar or Kilner-style jar.
To make the starter for the first time
Combine 50g strong white flour with 50ml lukewarm water in a jar. Leave it in a warm place (not hot). Each day, remove half of the starter (the 'discard' - see below for tips to avoid wastage) and replace it with 50g flour and 50ml lukewarm water. By the third day or so, you should begin to see bubbles. It's important to keep the starter small, so do remember to discard half each time. Once it's bubbling, you can begin the bread-making process (below).
To maintain your starter
Leave it out at room temperature and aim to feed it once every two to three days. If in a warm place, such as next to an Aga or in the airing cupboard, you'll find that it stays active for longer, so you might get away with feeding it less frequently; judge the required frequency based on how bubbly it is. To reduce the quantity of discard waste, you can now afford to remove less and add less: remove a few spoonfuls, then add 30g bread flour and 30ml water, and mix together. If you're not baking bread regularly, you can remove and add even smaller amounts. Just remember always to add equal quantities of each, and always to keep your starter fairly small and fresh by removing some discard each time. Personally, I don't keep my starter in the fridge: I prefer to bake spontaneously, which means having ready access to a bubbling starter at all times (keeping it in the fridge requires more advance planning, bringing it up to temperature and getting it bubbling again. In my experience, it takes more than a few feeds to remove it from its dormant state, by which time the moment has passed!).
A note on sourdough discard
As you'll see, this process produces a fair amount of 'discard'. Rather than throwing it away, freeze it until you've amassed enough to bake with it. See my sourdough discard recipes for some ideas of what to make. For example, my banana loaf here and my Cornish saffron buns here.
Once you're feeling proficient
Once you've mastered the standard sourdough loaf, why not try my cheese and marmite version or, for Christmas, my sourdough stollen.
To make a sourdough loaf
1. When you want to bake, make sure your starter is ready. The day before, feed the starter with 50g bread flour and 50ml water.
2. When it’s looking bubbly (probably around 8 hours later), you can make a levain. Take two generous tablespoonfuls of starter and mix them with 50g bread flour and 50ml water. Leave this levain, covered, for around 8 hours or overnight. (Tip: to kick-start your starter or levain, put them in the oven - covered - on a very low temperature - the lowest your oven can be set at. No higher than 25°C). You can test if your starter or levain are ready by seeing if a spoonful floats in slightly warm water. The success of the loaf is all in the starter and levain - they've got to be bubbly before you start. The oven trick is particularly useful if your house is cold.
The levain
3. Put the levain in a large mixing bowl and pour over 300ml of tepid (just warm to the touch, no warmer) water. Mix together.
4. Add 500g bread flour. White is a good one to start with. I use Canadian strong plain. Mix together until it forms a rustic-looking dough. Cover with a tea towel and leave to prove for at least 2 hours and no more than 4 hours.
4. Add 500g bread flour. White is a good one to start with. I use Canadian strong plain. Mix together until it forms a rustic-looking dough. Cover with a tea towel and leave to prove for at least 2 hours and no more than 4 hours.
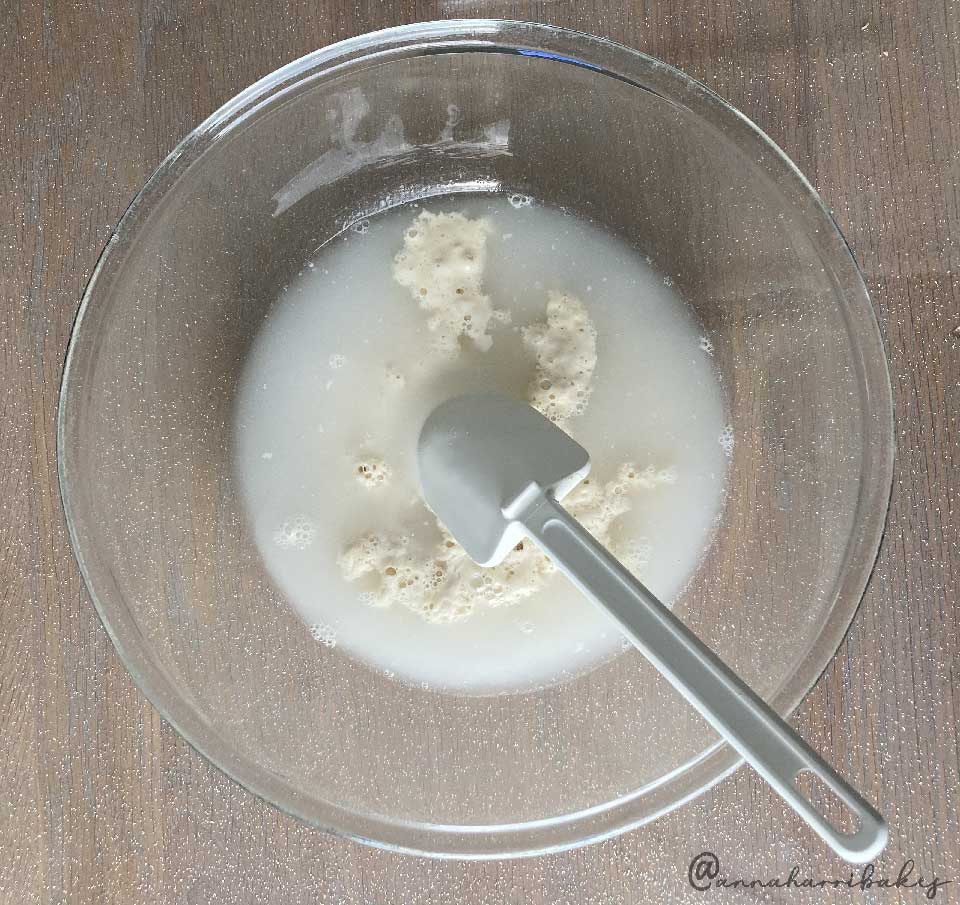
Add the water to the levain, which should float
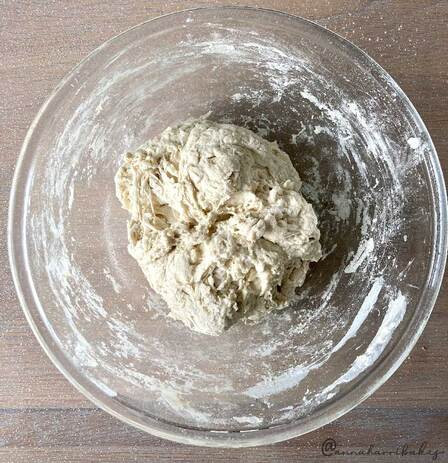
Bring it together into a rustic-looking dough
|
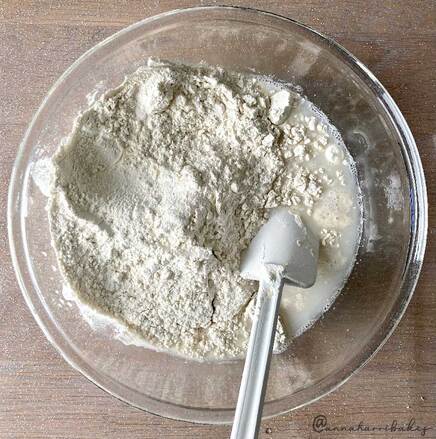
Add the flour

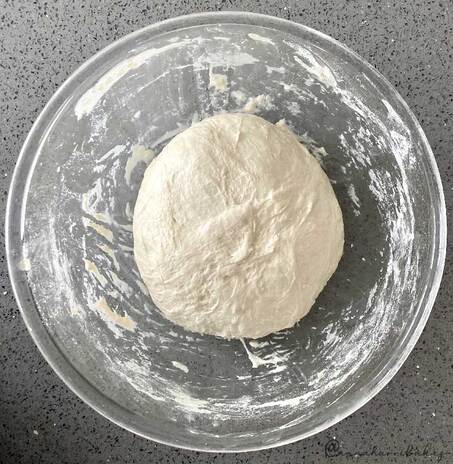
After 4 hours' rest and before adding the salt and water
|
5. Add 10g salt and 25ml tepid water to the dough and, with your hands, bring the dough together again. Be fairly gentle with it.
6. Leave it, covered with a tea towel, for another 15 minutes and then do your first stretch and folds. Pull one side of the dough outwards and then fold it over on top. You’re trying to trap air, so don’t knock any out. Repeat until you’ve done this the whole way round the dough ball. Then carefully turn it over and do it again on the other side. Leave to rest for 30 minutes, then repeat. Leave for another 30 minutes, then repeat again. Each time, cover it with a tea towel.
After adding the salt and water. Notice how it's a smoother dough now
|
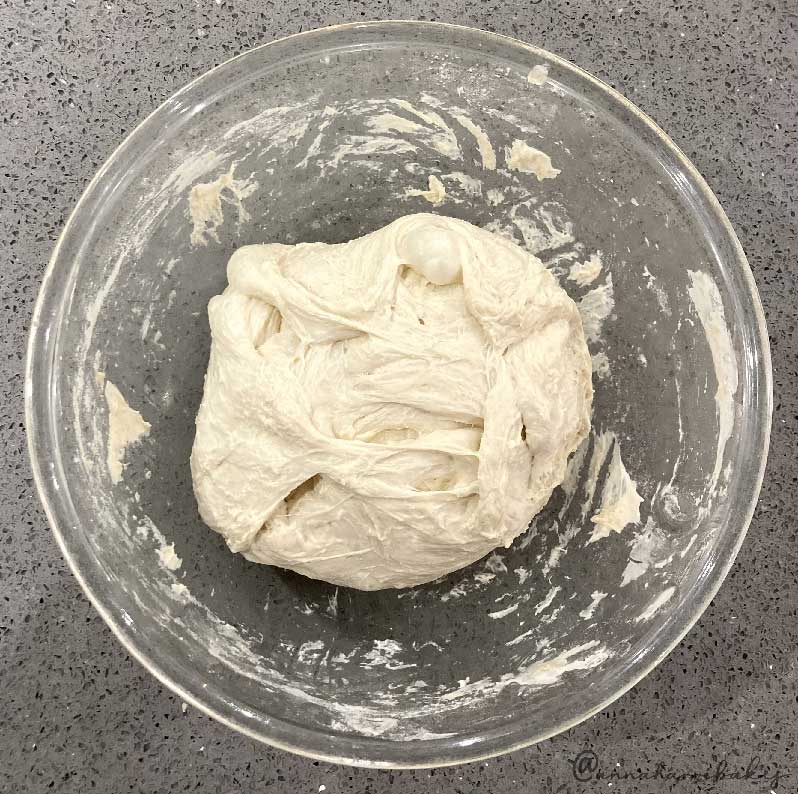
Stretch and folds
|
7. At this point I tend to put it in the proving basket. To do this, gently remove the dough from the bowl (I tend to gently scrape it out until it glides out of the bowl onto the work surface). Make the dough into a circular or oval shape (depending on your basket’s shape) by doing a few more gentle stretch and folds to make the right shape. Tuck the edges in. Make sure the basket is either heavily dusted with flour or lined with a tea towel which has also been heavily dusted with flour (don’t skimp on the flour here, else it will stick to the basket and cause issues later on). Then gently lift your dough into the basket rough side up (smooth side down). E.g. the top side of the dough that was sitting on your worktop should remain the top side when lifted into the basket. I sprinkle it with more flour to stop it sticking to the tea towel (see next step).
8. Leave it covered with a tea towel for at least a couple of hours before baking but preferably all day/overnight (I don't recommend longer than 9 hours). For this long prove, make sure you put it somewhere very cool or even in the fridge. Otherwise it will over-prove. I put it on the floor in the coolest place in my house, away from central heating. If putting it in the fridge overnight (which will afford you a bit more flexibility if you don't want to wake up too early), I like the dough to have had a little kick-start at normal room temperature before putting it in the fridge and again before putting it in the oven so I suggest a couple of hours proving at room temperature between these stages.

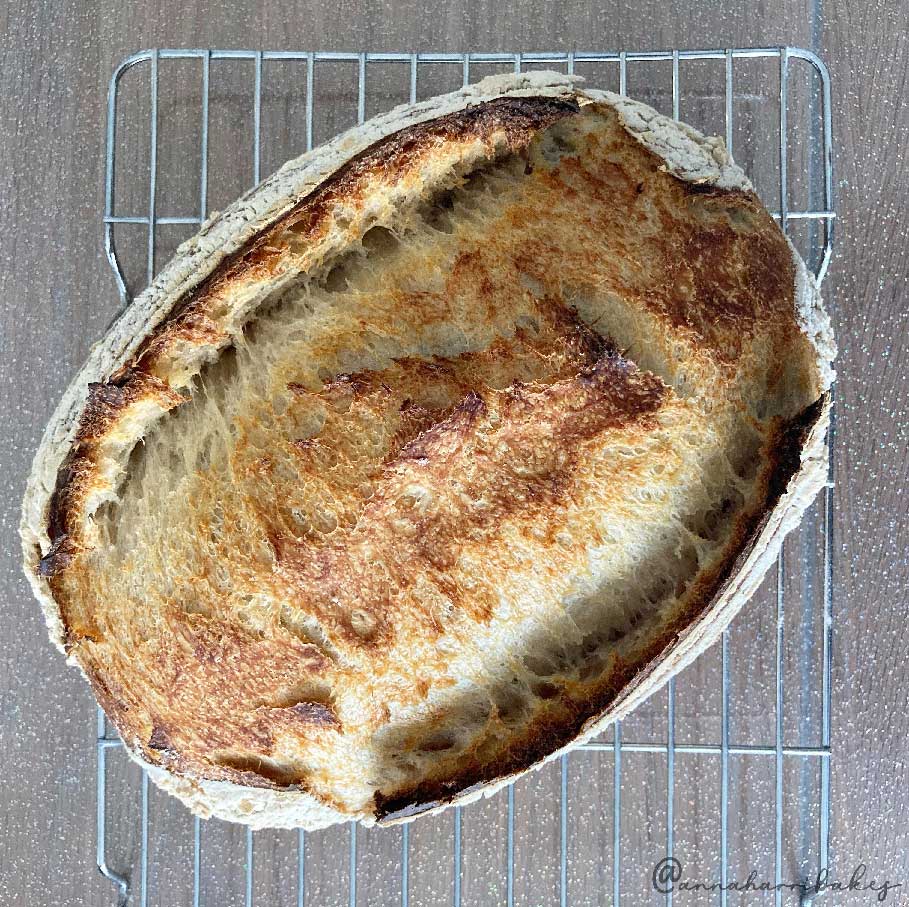
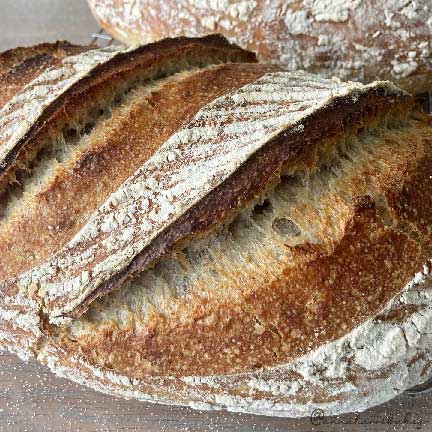
9. When you’re ready to bake, bring the oven AND baking pot up to temperature: 220°C (fan), 240°C (non fan). Then, remove the lid of the baking pot - this is what the bread will sit on. Carefully flip the dough over and out of the proving basket. I do this by placing a piece of parchment over the top of the dough, flipping the basket over the lid and gently easing it out onto the lid (so there should still be a piece of parchment between lid and dough).
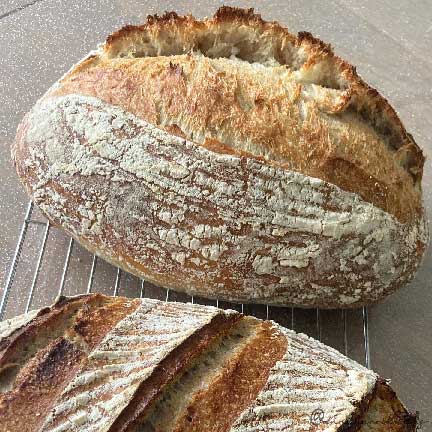
10. Quickly score the top of the bread using a lame or very sharp knife. This is where the bread will open up in the oven - by slitting it, you’re controlling the tear. If you don’t do it, the tear will happen at random which is also fine!
11. Put the (preheated) main part of the dish onto the lid, so the bread is covered and so as to create a steam chamber. Bake at 220°C (fan), 240°C (non fan) for 30 mins and then remove the lid. I tend to bake it for another 20-30 minutes depending on the colour and crispness I’m aiming for, so check it after 10 minutes to make a judgement.
|
|